A chronicle of my gaming adventures and misadventures with a little bit of everything occasionally tossed in. It covers Flames of War, Warhammer 40k and Fantasy battle, Disposable Heroes, Sky galleons of Mars, Chasepot and Needle Gun, The Sword and the Flame, Warhammer Ancients and many others.
Tuesday, December 22, 2009
Valkyries Finished
I finished up a couple Valkyrie transports for my friend tuna over the weekend.
 Here is Valkyrie one.
Saturday, December 19, 2009
From the Workbench
Here are a few pictures of models in progress on my Painting table.
 Her are a few I am painting for my friend Tuna. The Executioner has the forgeworld turret and is actually finished. The Valkyries need a bit more work but I should have them finished soon.
 A close shot of the Executioner for a better look.
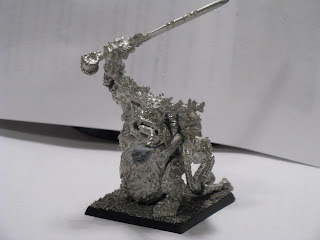 A Great Unclean One, one of the Greater Daemons of Nurgle. This model has been in the bits box for several years. I picked it up from a friend of my with a bunch of plaguemarine and nurgle bits. He had bit ordered a bunch of stuff for another acquaintance and the guy never showed to get the bits. I decided to build this one to add to my nurgle apocalypse forces and maybe in a chaos daemon army.
 The one short coming of the model was it was missing the tip of its tongue but a quick pick from a chaos mutation sprue and voila new tongue tip.
 A side shot to show some of the join detail. A simple tongue swap to make the model unique.
 Here is a forgeworld Vindicator kit I have assembled as a Death Guard chaos vindicator. Another addition to my apocalypse Death Guard force. When I get this finished it will give me two chaos vindicators and three imperial vindicators for one hell of a Line Breaker Squadron
 A close up of the pintle gunner. I used a Plague Marine head to help blend in with the army theme.
 Another close up of the gunner. I joined the Plague marine head into the gunner torso, added a Death Guard shoulder pad and converted the combi-flamer to a combi-melta. I really like the combi-melta. They always knock out the demolisher cannon but the combi-melta still makes them worry.
 Another close up with a better view of the combi-melta conversion. I used the combi-flamer bit that comes with the chaos vehicle sprue. I cut off the bottom tank and the flamer barrel. I them added a drilled out piece of sprue for the melta muzzle. I finished it by using green stuff to make the barrel, add the muzzle detail and turn the flamer fuel tank to a melta tank.
 Another oldie but goldie an Imperial Guard Landspeeder. It is destined to join my Adeptus mechanicus Guard army once it is finished.
 A side view of the IG Speeder. I received the model in a trade and it was missing its original plasma cannon. I originally added a multimelta but with the release of the new guard codex giving sentinels a plasma cannon I swapped it with an old Ork heavy plasma gun. The ork gun is bulkier than the old imperial plasma cannon but I now I can field it in my Adeptus Mechanicus army in a regular game as a sentinel.
 This is a bubblegum machine Mecha that I am planning on fielding as a 15mm Weird World War Two unit. My plan is to use it as a proxy unit in my flames of war army but I haven't decided which unit it will represent.
 Her are a couple test models I have been working on. I think they will become part of a veteran squad once i build a few more. I was inspired to try the conversion by an Adeptua Arbite unit I saw online. the guy had converted the lasguns to look more like H&K MP5 submachineguns and did a great job of it. My Las carbine conversion is a piece of styrene rod as the muzzle and two pieces of styrene strip glued together with a little green stuff to make the magazine. The other is a shotgun. I cut off the barrel of the las gun at the front site and drilled it out to make a shotgun sized muzzle. I then cut off the lasgun magazine, trimmed down a boltpistol magazine and glued it in place. A touch of green stuff and a new combat shotgun.
 These are a couple catachan officer that I am painting up to join my Adeptus Mechanicus guard army
 Some mystery men models but they are rogue trader Commissars that I have stripped, rebuilt and reprimed. Several of them had stormbolters and had to have a weapon swap to be legal under the new codex.
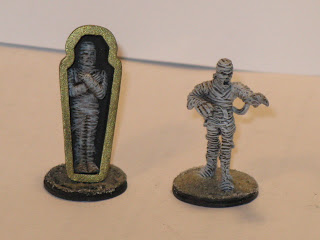 These are a couple Mummies I have been painting up for some Pulp goodness. I just have to finish the bases and they are ready to go. I also plan to double duty them as proxy Wraiths on my warhammer Vampire Counts army.
 This is Nog the Minotaur pirate. It is a Reaper model that I have repaired the broken horn and converted the sword from a cutlass it came with to a minotaur sized Rapier. The model is based on a npc character from my old Warhammer Fantasy Roleplaying group. The group had taken a Minotuar captive. They named it Nog and proceeded to bring it into the light of civilization by fighting in pit fights. It was an interesting addition to the game. It was always trouble having inside a town even if they did have him chained up or hidden in a wagon but out in the countryside he was always a surprise for a bunch of adventurers to have a pet minotaur. They eventually taught him how to use a rapier and entered him in the Middenheim minotuar fights were he went undefeated. Eventually the player retired several characters and Nog went with the to the west and the ocean.
I imagine this as the later Nog. Separate from the restraints of his companions and now the leader of a cutthroat band of corsairs. You can take the Minotaur out of the savage forest but no matter how much you beat him, make him wear clothes and not eat people, you can't take the savage out of the Minotuar.
 A couple more Rogue Trader Models. These are two Keepers of Secrets that are greater Daeamons of Slaannesh. I have had these models since I started playing warhammer long ago. I recently stripped them and then reassembled them. I was going to use them to go with the Eldar Harlequin Solitaire data sheet Matt P made for Apocalypse games. The basic premise is that whenever the solitaire is killed a Keeper of Secrets shows up to take its soul, but this is a trick and the solitaire returns the next turn. Si as long as you have spare keeper of secrets to solitaire can return every turn.
Saturday, December 12, 2009
New Project: Nurgle Contagions
I have decided on a new scratch build project. I am planning to build three Nurgle Contagion Daemonic Engines for Apocalypse games. I think they will be a good addition to my Apocalypse Deathguard army.
I am imagining a super heavy artillery piece, sort of a Plague Tower Lite.
I haven't finalized a datafax but something similar to a vindicator tank's armor, with 2 structure points, a longer range pus mortar and a pus cannon, and include the nurgling infestation and explosion of filth special rules from the Plague Tower.
I am undecided about a points cost and I am still researching if it had a transport capacity or not.
I want to have the first one done by 31Jan2010 and enter it in the PapaNurgle forum Nurgle Apocalypse contest.
My basic ideas is to start from a foam insulation block for the hull and the trebuchet counter weight. Cast up more wheels like the ones I used for the Plague towers. Build the trebuchet from balsa or bass wood and a hull cannon from PVC pipe.
I am still looking for a more detailed picture to use as a guide for the build.
ColKG
Monday, December 7, 2009
Reviresco Minos finished
The Minos is finished and delivered to Chuckaroobob. Here are a couple more in progress shots.
 Here is the sides on and the roof of the superstructure test fitted.
 Here is an almost finished shot. Everything assembled and test fitted. I just have to glue down the tabernacles and hold covers then finish the two lower masts.

Minos Finished! All parts painted and assembled but no rigging. I didn't really have a good plan to go by and after talking to Chuckaroo we decided running all the lines would get in the way moving figures around. I made some deviations from the standard Minos. The top of the wheel house and the boats are removable for accessibility. I also toned down the colors of the various fittings, so it would look a little more naval and less a colorful floating Greek bordello.
Minos Finished! All parts painted and assembled but no rigging. I didn't really have a good plan to go by and after talking to Chuckaroo we decided running all the lines would get in the way moving figures around. I made some deviations from the standard Minos. The top of the wheel house and the boats are removable for accessibility. I also toned down the colors of the various fittings, so it would look a little more naval and less a colorful floating Greek bordello.
As I type, I believe a plan is underway to make the Minos a centerpiece in an upcoming Prospector Bob pulp game. Time will tell.
Thursday, December 3, 2009
Progress on the Minos
The Minos is nearer to completion. I would have had the hull sides on but I ran out of contact cement and the super glue bled through the paper too much. The only real complaints with the kit so far is that some of the parts needed to be a bit larger and some of the double sided printed sheets were just a bit off. The flip side is some of the pieces were too big but you can trim a piece to fit and the misprinted parts can be touched up with a bit of paint. I finally finished painting the portholes and hatchways. Most were horribly cast and filing them to some sort of normal shape had held up assembly of the hull. The next real hurdle is going to be the rigging. No plans for that in the kit. It is going to be all guess work from the few pictures in the instructions. I am still trying to figure out exactly which bits and bobs go where.
Soon it will take to the gaming waters.

Soon it will take to the gaming waters.
Labels:
Chuckaroobob,
Colkillgore,
Disposeable Heros,
Minos,
Pulp,
Work In Progress
Tuesday, December 1, 2009
Tanksgiving at PBKW
On 21 Nov 09 I went with the Basement of Heaped Miniatures Regulars down to the Catawba gamers "Tanksgiving" flames of war event. It was held in Cornelius at Parker Banner Kent and Wayne game store. It is a mass game centered around the players fielding mostly tanks. We played a Midwar game and had a mostly Soviet verses german with a couple of British and Chuckaroobob as the single American player.
 Here is an over view of the table deployment set up. With some of the BOHM regulars at the table next to the wall.
 Jody Pleasent the head of the Catawba Historical Gaming and organizer of the event at PBKW.
 The Germans move first and a unit of Panther tanks line up across the table from my Kv-1s.
 The Panthers fire. One destroyed Kv-1s and three bailed out.
 One Kv-1s recrews and the two active tanks head for cover in the center of the table with a company of Grant tanks. Hidden in the trees are my two Su- 152s with a litle surprise waiting for the Panthers.
 The upper side of the table at the end of turn one.
 German Airstrike hits the armored spearhead and destroy nothing.
 Russian counter airstrike knocks out one Panther.
 Two turns later and two more Panthers knocked out by my Su-152s. Of course they had knocked out one of the Su-152s but that is war.
 The highlight of my game is when the leader of the panther unit failed his Motivation and retreated off the board. I was kind of stunned but it had to happen sooner or later. We played a final turn before breaking for supper and the game ended with the allies ambushing tons of tanks and taking the game by a healthy 12 point margin.
It was another great day of gaming sponsored by the Catawba Gamers.
Flames of War in the Basement of Heaped Minis
Hi Kids, To celebrate the long weekend we had some longer than normal gaming going on. In total we played 3 games of FoW with 7 total players, anywhere from 1500 point mid war to 4000 pt late war stuff.
Once again I was saddened to see nothing lighter than 50 tons in the German forces, and once again the Hun players dug in on their starting positions and waited for their opponents to give them all the advantages of cover, entrenchments, and stationary rate of fire. They didn't even have to start their tanks' engines until turn 5 or so. Am I crazy or was the German army famous for aggressive tactics? Did they just sneak across the border, dig in at the first crossroads and wait for the defenders to try to eject them? It would've taken 40 years to reach the Channel coast, so I get the notion that they used slightly more manuevering.
But that's just me.
Monday, November 30, 2009
Adeptus Mechanicus Guardsman tutorial
I have been building an Adeptus Mechanicus army for several years now. It first started for use with a home grown Adeptus Mechanicus codex put together by Tim Huckleberry of GW fame. The codex was ( and still is) a work in progress. Some units ended up needing to have weapons changed as the codex evolved so I came up with a system that would let me easily change around weapon options. Some of the local players aren't too keen on home grown army lists so I set up my AdMech to play as an Imperial Guard army too. This was back during the third edition of Warhammer 40k and you needed three squads to field a basic guard army. The first two squads were for an infantry platoon with two squads and the third squad was for an armored fist squad. It was a basic army but before I finished the first three squads the 4th edition guard codex came out and brought us army doctrines. I latched onto chem inhalers and cybernetic enhancements. These two really embodied the Admech force was building. A bunch of drug charged cybernetic servitors walking into the enemies guns.
It prompted me to finish the conversions for a full army and then play the worst game of 40k I had played until then and since. I fielded my fully painted and 95% converted army against a unpainted optimized tournament army. By games end, my army was wiped out to the last model. While in return, I had managed to stun my opponents dreadnought and that was it. I didn't kill a single model and was wiped out. Back to the drawing board and the conversion table. I sacrificed a chunk of my Catachan army to reengineer them into the Admech force adding more special and heavy weapons. I added more tanks and still lost more than I won but was able to at least give my opponents a run for their money.
Then came the newest Imperial Guard codex and the latest growth of my Admech army. I love the new Guard codex. It has finally given guard players the tools to make other players fear playing a guard army instead of of thinking "easy win" when they see Guard across the table.
Enough history, here is a tutorial on how I build my Adeptus Mechanicus Guardsmen.
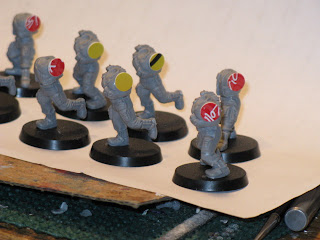 First I start by assembling a basic Catachan legs and torso. I then round up a plastic gift card and break out my standard paper hole punch. I then punch out as many discs as I need for the current project. Then I glue one disc to each left arm on the torso. This will be the base of the weapon arm.
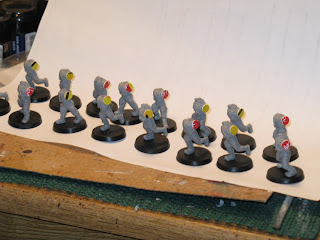 A group shot of the current set of reinforcements.
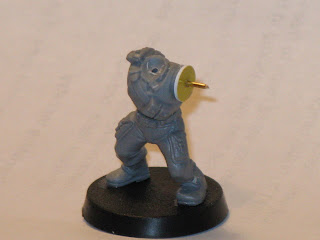 Then drill holes in the neck area of the torso and and the center of the disc. Glue a piece of wire in the disc's hole leaving about 4mm or so exposed.
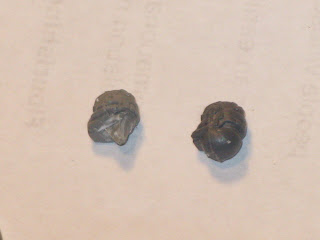 To prep the head I carve down the neck to a point to make the join easier in the torso. I prefer to use space marine or chaos space marine bald heads with rebreathers but have used different heads as long as they have some bionic bits on them.
 Use a hobby knife to slowly carve out the neck in the torso using the pilot hole previously drilled there. I basically put the point of the knife in the drill hole and turn the knife so it leaves a cone shaped hole.
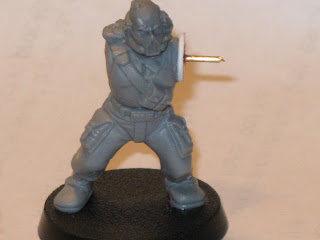 I dry fit the head and the cavity in the torso so that the head will set more natural. Sometimes I have to either carve the hole larger or whittle the neck down to get it to set right. Then put a bit of plastic cement in the hole and set the head in. If you did it right it should set right but usually I have to go back and add a bit of green stuff to fill some of the gaps.
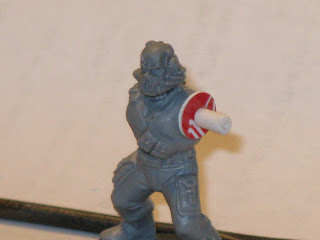 Next add the weapon rail. Take a piece of 2.5mm styrene rod and cut it into 5mm sections. Drill a hole in one end and then glue it onto the wire glued into the shoulder disc. The 5mm length is fine for lasguns but I have had to vary the length to fit various weapons.
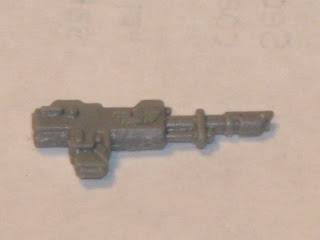 This is the cut down Catachan lasgun. Remove the stock and pistol grip and smooth down the cuts.
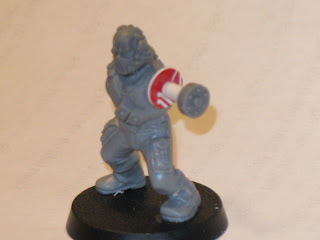 Before adding the weapon I trim the back off of a space marine bike wheel hub cap and then glue it to the end of the styrene rod.
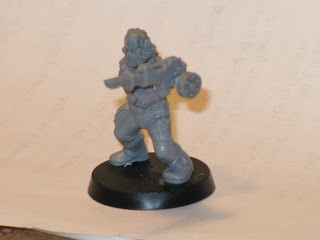 Then I glue on the cut down lasgun to the rod, completing the weapon mount. I use superglue for this join. This gives me the option of changing the model's weapon. Over the years and through three codex rewrites I have had to reequip several models and the superglue allows an easier break than plastic cement.
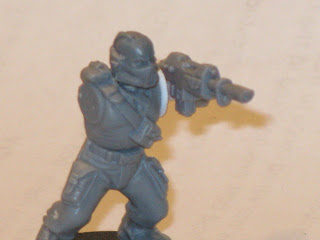 Here is a view of the half way completed guardsman.
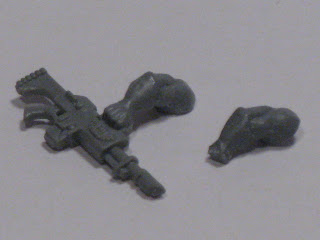 The claw arm is made from the Catachan arm carrying a lasgun by the handle. I cut the hand off a little above the knuckles and then square the stump off.
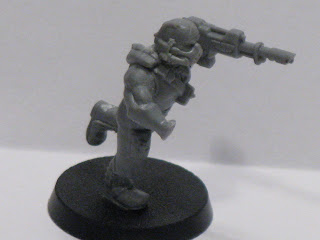 Then glue the cut down arm on and leave it set up.
 While waiting for the arms to cure, I start cutting out the basic claw components from styrene strips. I need two strips of 0.8mm x 1.5mm 5mm in length and two strips of 1mm x 2mm 3mm in length. This takes a while but I usually knock the strips in batches so I can assemble a few and let the glue cure while I work on the next batch.
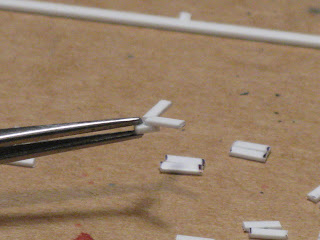 I sort the strips and pair up a set of two 1mm x 2mm and two 0.8mm x 1.5mm strips. One thing to be said about tools, I use two sets of tweezers. The pair pictured is a set of spring tweezers I use to hold one of the 1mm x 2mm strips. Then trim the corners off of the two 0.8mm x 1.5mm strips. I put a drop of plastic cement on the base strip and then use a second set of tweezers to place the trimmed strips on to the glue. I place the trimmed corner against each other and then use the tweezers to press the two strips flat. The trimmed corners give the angle for the claw. I then ad another drop of cement on top of the trimmed strips and add the remaining 1mm x 2mm strip on top. I then press the top strip down and slide the claw out of the tweezers. I set the claw aside and adjust the pieces to get them level before the glue sets.
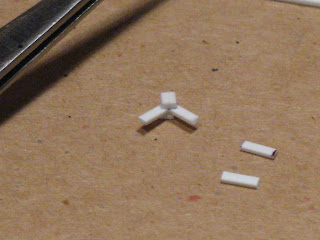 A completed basic claw.
 After the claw has set I glue it to the stump of the Catachan arm. Sometimes the arm has to be trimmed down and/or be filed to get it level. Once the join has cured I go back and trim down the corners of the claw to make it look more like a pincer.
It prompted me to finish the conversions for a full army and then play the worst game of 40k I had played until then and since. I fielded my fully painted and 95% converted army against a unpainted optimized tournament army. By games end, my army was wiped out to the last model. While in return, I had managed to stun my opponents dreadnought and that was it. I didn't kill a single model and was wiped out. Back to the drawing board and the conversion table. I sacrificed a chunk of my Catachan army to reengineer them into the Admech force adding more special and heavy weapons. I added more tanks and still lost more than I won but was able to at least give my opponents a run for their money.
Then came the newest Imperial Guard codex and the latest growth of my Admech army. I love the new Guard codex. It has finally given guard players the tools to make other players fear playing a guard army instead of of thinking "easy win" when they see Guard across the table.
Enough history, here is a tutorial on how I build my Adeptus Mechanicus Guardsmen.
Labels:
Adeptus Mechanicus,
Colkillgore,
Conversions,
GW,
Tutorial,
Warhammer 40k
Subscribe to:
Posts (Atom)